Development/Android
8. Layout
궁선이
2018. 5. 5. 01:37
오늘은 앱을 구성하는 기본적인 요소인
레이아웃의 종류에 대해서 설명하겠습니다.
레이아웃에는 크게 5가지의 레이아웃이 있습니다.
1. Linear Layout
2. Table Layout
3. Grid Layout
4. Relative Layout
5. Frame Layout
차례대로 하나씩 해보겠습니다.
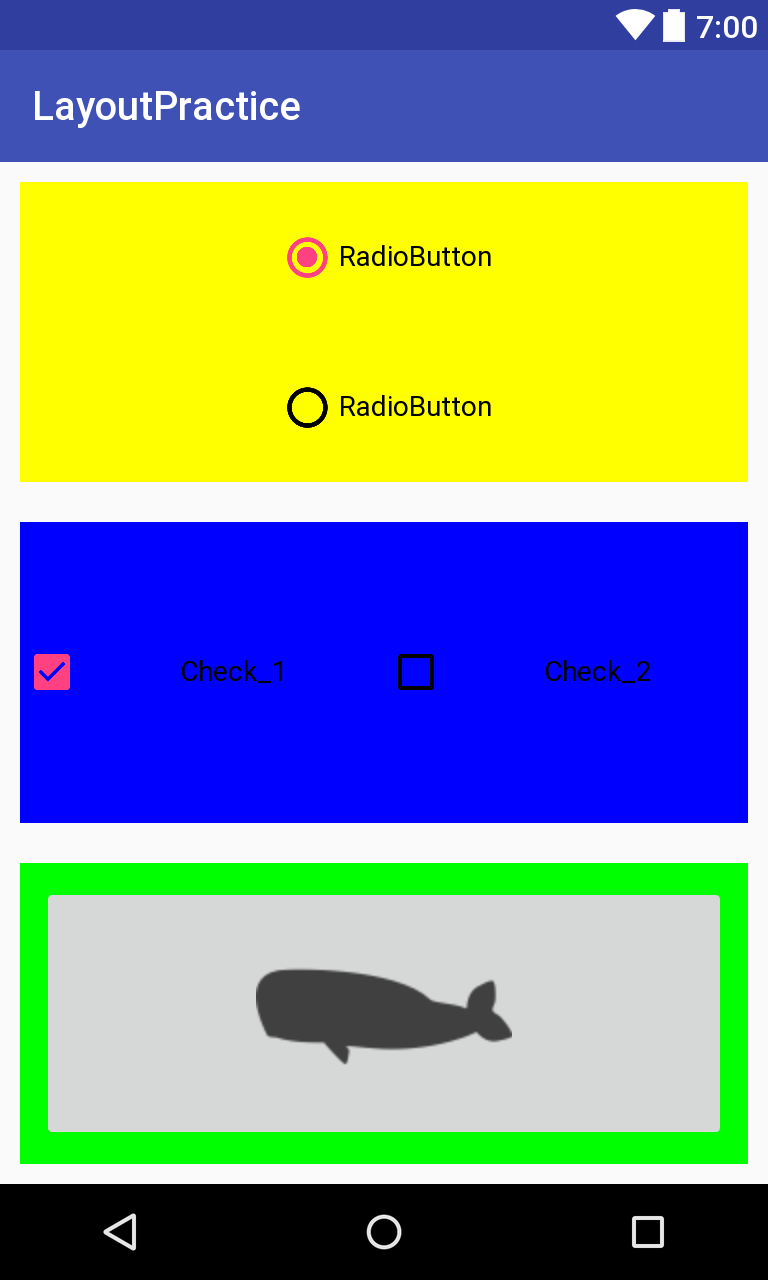
1. Linear Layout
선형으로 컴포넌트들을 나열하여 줍니다.
기본적으로 orientation 속성을 통해서 나열할 방향을 정합니다.
android:orientation="vertical" //수직방향
android:orientation="horizontal" // 수평방향
예제코드와 화면으로 특성을 보겠습니다.
<?xml version="1.0" encoding="utf-8"?>
<LinearLayout xmlns:android="http://schemas.android.com/apk/res/android"
xmlns:app="http://schemas.android.com/apk/res-auto"
xmlns:tools="http://schemas.android.com/tools"
android:layout_width="match_parent"
android:layout_height="match_parent"
android:orientation="vertical"
tools:context="com.example.mskir.layoutpractice.LinearLayout_p">
<LinearLayout
android:layout_width="match_parent"
android:layout_height="100dp"
android:background="#ffff00"
android:layout_margin="10dp"
android:layout_weight="1"
android:orientation="vertical">
<RadioGroup
android:layout_width="match_parent"
android:layout_height="match_parent"
android:gravity="center_horizontal">
<RadioButton
android:checked="true"
android:id="@+id/radioButton2"
android:layout_width="wrap_content"
android:layout_height="wrap_content"
android:layout_weight="1"
android:text="RadioButton" />
<RadioButton
android:id="@+id/radioButton"
android:layout_width="wrap_content"
android:layout_height="wrap_content"
android:layout_weight="1"
android:text="RadioButton" />
</RadioGroup>
</LinearLayout>
<LinearLayout
android:layout_width="match_parent"
android:layout_height="100dp"
android:background="#0000ff"
android:layout_margin="10dp"
android:layout_weight="1"
android:orientation="horizontal"
android:gravity="center">
<CheckBox
android:id="@+id/checkBox2"
android:layout_width="wrap_content"
android:layout_height="wrap_content"
android:layout_weight="1"
android:text="Check_1"
android:checked="true"
android:gravity="center"/>
<CheckBox
android:id="@+id/checkBox"
android:layout_width="wrap_content"
android:layout_height="wrap_content"
android:layout_weight="1"
android:text="Check_2"
android:gravity="center"/>
</LinearLayout>
<LinearLayout
android:layout_width="match_parent"
android:layout_height="100dp"
android:background="#00ff00"
android:layout_margin="10dp"
android:layout_weight="1"
android:padding="10dp">
<ImageButton
android:id="@+id/imageButton"
android:layout_width="wrap_content"
android:layout_height="wrap_content"
android:layout_weight="1"
android:visibility="visible"
app:srcCompat="@drawable/whale" />
</LinearLayout>
</LinearLayout>
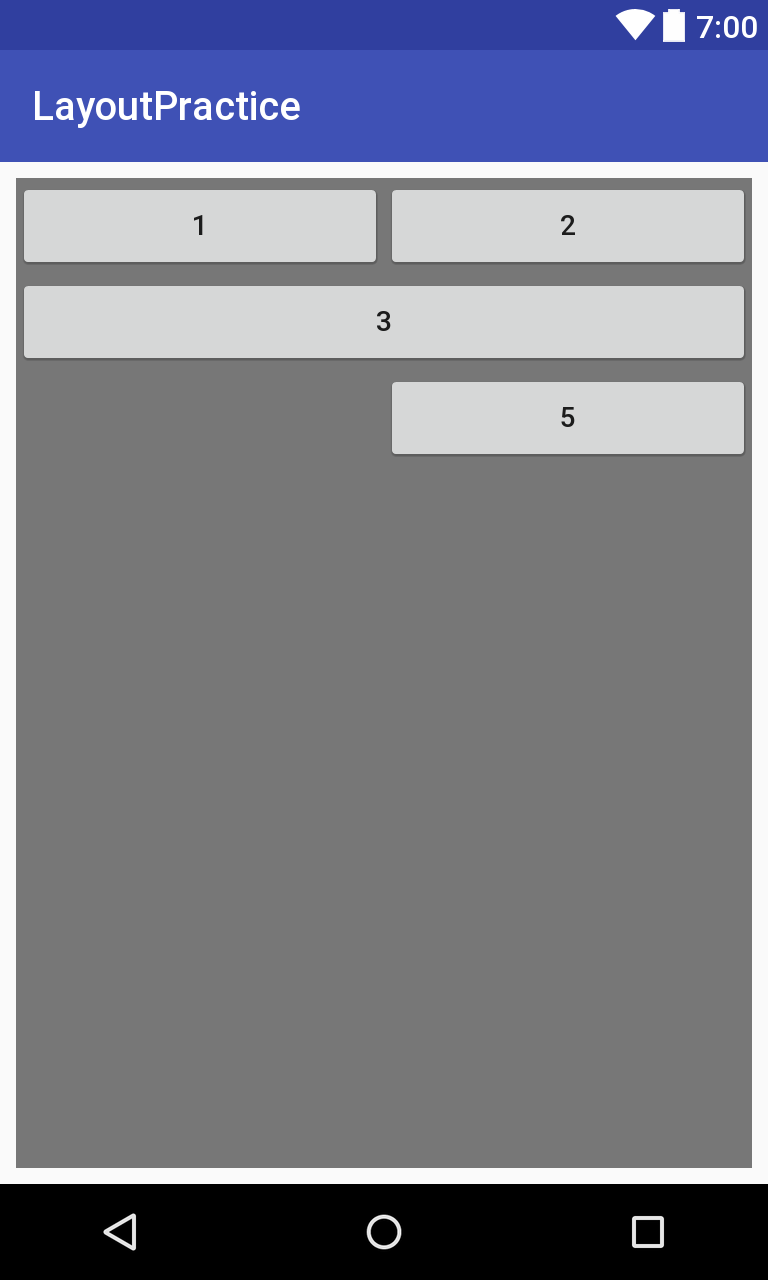
2. Table Layout
테이블레이아웃은
Row 와 Column으로 이루어져 있습니다.
Row를 선언하고 안에서 Column을 나누어 줍니다.
Row를 층층이 쌓아올리는 방식입니다.
다음 속성을 주면 테이블 레이아웃이 좌우로 부모레이아웃의 길이 만큼 확장합니다.
android:stretchColumns="*"
Column을 지정해 해당 위치에 바로 집어 넣을 수도 있습니다.
<?xml version="1.0" encoding="utf-8"?>
<android.support.constraint.ConstraintLayout xmlns:android="http://schemas.android.com/apk/res/android"
xmlns:app="http://schemas.android.com/apk/res-auto"
xmlns:tools="http://schemas.android.com/tools"
android:layout_width="match_parent"
android:layout_height="match_parent"
tools:context="com.example.mskir.layoutpractice.TableLayout_p">
<TableLayout
android:layout_width="368dp"
android:layout_height="495dp"
android:background="#777777"
android:layout_margin="20dp"
android:stretchColumns="*"
tools:layout_editor_absoluteY="8dp"
tools:layout_editor_absoluteX="8dp">
<TableRow>
<Button
android:layout_width="wrap_content"
android:layout_height="wrap_content"
android:text="1"
/>
<Button
android:layout_width="wrap_content"
android:layout_height="wrap_content"
android:text="2"
/>
</TableRow>
<TableRow>
<Button
android:layout_width="wrap_content"
android:layout_height="wrap_content"
android:text="3"
android:layout_span="2"
/>
</TableRow>
<TableRow>
<Button
android:layout_width="wrap_content"
android:layout_height="wrap_content"
android:text="5"
android:layout_column="1"
/>
</TableRow>
</TableLayout>
</android.support.constraint.ConstraintLayout>
3.Grid Layout
그리드 레이아웃은 테이블 레이아웃과 다르게 사전에
Row와 Column을 설정하여 줍니다.
여러 Row나 Column에 걸쳐서 컴포넌트를 배치시킬 수 있습니다.

<?xml version="1.0" encoding="utf-8"?>
<android.support.constraint.ConstraintLayout xmlns:android="http://schemas.android.com/apk/res/android"
xmlns:app="http://schemas.android.com/apk/res-auto"
xmlns:tools="http://schemas.android.com/tools"
android:layout_width="match_parent"
android:layout_height="match_parent"
tools:context="com.example.mskir.layoutpractice.GridLayout_p">
<GridLayout
android:layout_width="wrap_content"
android:layout_height="wrap_content"
android:background="#777777"
android:rowCount="3"
android:columnCount="3"
tools:layout_editor_absoluteY="8dp"
tools:layout_editor_absoluteX="8dp">
<Button
android:layout_gravity="fill"
android:layout_rowSpan="2"
android:text="1"/>
<Button
android:text="3"
android:layout_gravity="fill"
android:layout_columnSpan="2"/>
<Button
android:layout_row="1"
android:layout_column="1"
android:text="4"/>
<Button
android:text="2"
android:layout_row="2"
android:layout_column="0"/>
<Button
android:text="5"
android:layout_row="2"
android:layout_column="1"/>
<Button
android:text="6"
android:layout_row="1"
android:layout_column="2"/>
<Button
android:text="7"
android:layout_row="2"
android:layout_column="2"/>
</GridLayout>
</android.support.constraint.ConstraintLayout>
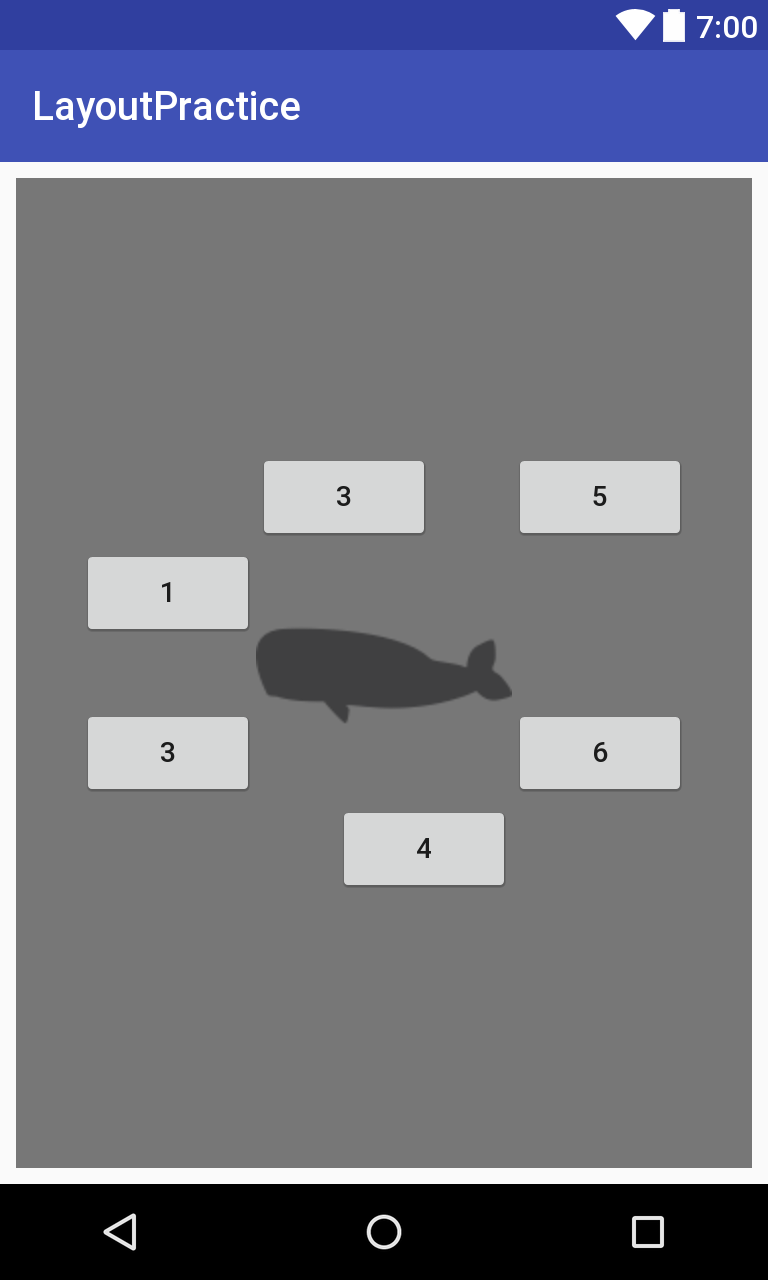
4. Relative Layout
기준 컴포넌트를 기준으로 속성값으로 상대적인 위치를 지정하여 줍니다.
코드를 보고 이해하시는 것이 더 빠를 것 입니다.
<?xml version="1.0" encoding="utf-8"?>
<android.support.constraint.ConstraintLayout xmlns:android="http://schemas.android.com/apk/res/android"
xmlns:app="http://schemas.android.com/apk/res-auto"
xmlns:tools="http://schemas.android.com/tools"
android:layout_width="match_parent"
android:layout_height="match_parent"
tools:context="com.example.mskir.layoutpractice.RelativeLayout_p">
<RelativeLayout
android:layout_width="368dp"
android:layout_height="495dp"
android:background="#777777"
tools:layout_editor_absoluteY="8dp"
tools:layout_editor_absoluteX="8dp">
<ImageView
android:layout_width="wrap_content"
android:layout_height="wrap_content"
android:src="@drawable/whale"
android:layout_centerInParent="true"
android:id="@+id/whale"/>
<Button
android:layout_width="wrap_content"
android:layout_height="wrap_content"
android:text="3"
android:layout_alignLeft="@id/whale"
android:layout_above="@id/whale"
/>
<Button
android:layout_width="wrap_content"
android:layout_height="wrap_content"
android:text="5"
android:layout_above="@id/whale"
android:layout_toRightOf="@id/whale"
/>
<Button
android:layout_width="wrap_content"
android:layout_height="wrap_content"
android:text="1"
android:layout_alignTop="@id/whale"
android:layout_toLeftOf="@id/whale"
/>
<Button
android:layout_width="wrap_content"
android:layout_height="wrap_content"
android:text="3"
android:layout_alignBottom="@id/whale"
android:layout_toLeftOf="@id/whale"/>
<Button
android:layout_width="wrap_content"
android:layout_height="wrap_content"
android:text="6"
android:layout_alignBottom="@id/whale"
android:layout_toRightOf="@id/whale"
/>
<Button
android:layout_width="wrap_content"
android:layout_height="wrap_content"
android:text="4"
android:layout_alignRight="@id/whale"
android:layout_below="@id/whale"
/>
</RelativeLayout>
</android.support.constraint.ConstraintLayout>
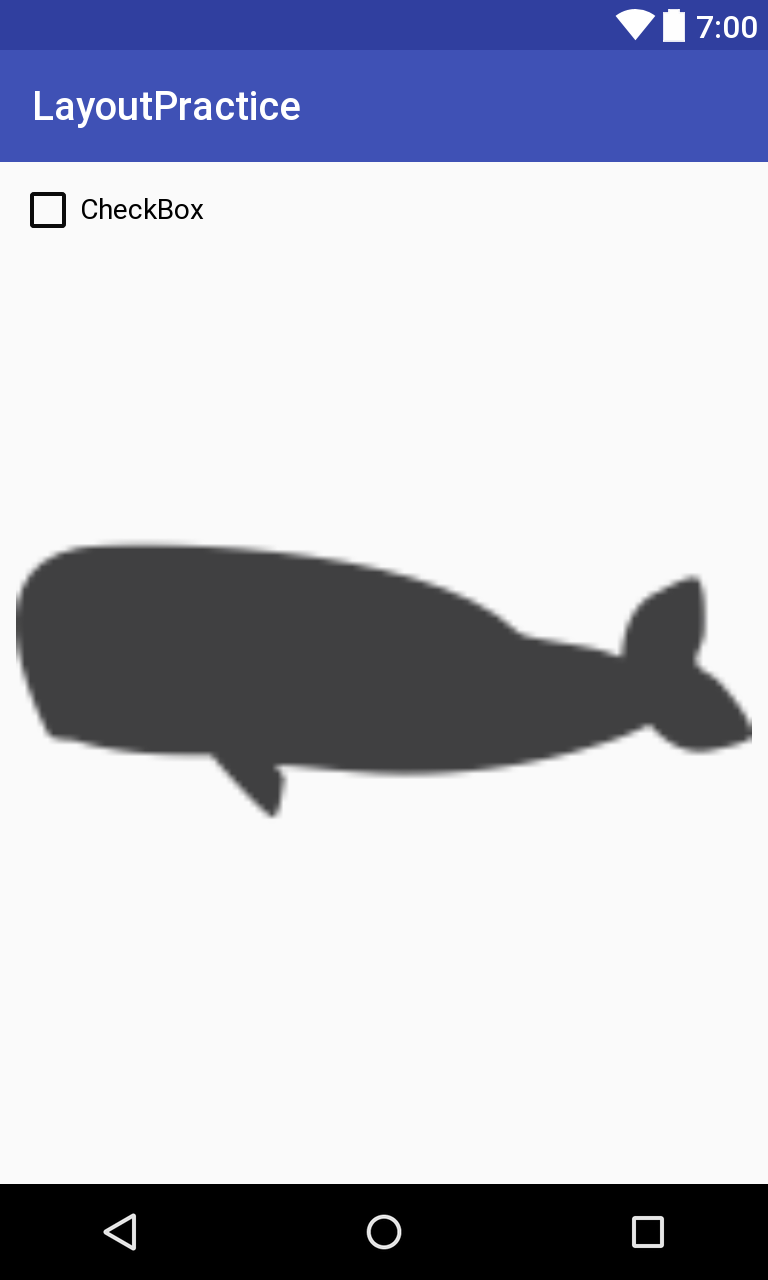
5. Frame Layout
Frame Layout은 레이아웃 내부의 컴포넌트들이 중첩되어 표시 됩니다.
다음 사진은 고래사진위에 체크박스가 표시되어 있습니다.
<?xml version="1.0" encoding="utf-8"?>
<android.support.constraint.ConstraintLayout xmlns:android="http://schemas.android.com/apk/res/android"
xmlns:app="http://schemas.android.com/apk/res-auto"
xmlns:tools="http://schemas.android.com/tools"
android:layout_width="match_parent"
android:layout_height="match_parent"
tools:context="com.example.mskir.layoutpractice.FrameLayout_p">
<FrameLayout
android:layout_width="368dp"
android:layout_height="495dp"
tools:layout_editor_absoluteX="8dp"
tools:layout_editor_absoluteY="8dp">
<ImageView
android:layout_width="match_parent"
android:layout_height="match_parent"
android:src="@drawable/whale" />
<CheckBox
android:layout_width="wrap_content"
android:layout_height="wrap_content"
android:text="CheckBox" />
</FrameLayout>
</android.support.constraint.ConstraintLayout>
감사합니다.